There are two situations where you want to sort and compare ring width curves to make them match together in a family:
For these two cases, you can use the same procedure in CDendro to find out how curves fit together! (i.e. use the Add best member.. button) |
|
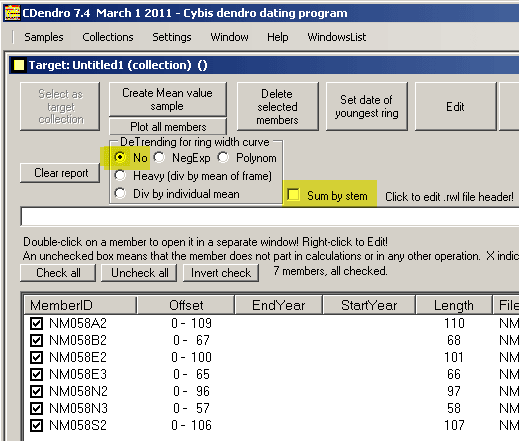
In the case of synchronizing a group of radii from the same stem, there are some things to remember:
|
|
If you have to stop your work when you are halfway through the job, just save your target collection as e.g. a .fil or a .fh collection. You should also save your unsynchronized collection. You may very well save that unsynchronized collection with all the members that you have already added to your target collection! When you later have time to continue, open that target collection and select it as your target. Then also open that unsynchronized collection and click the button "Add best members to target collection". Within your unsynchronized collection, CDendro will then automatically uncheck all members which have already been added to the target collection! This way you can resume your process of successively adding members to your target collection! |
|
If samples are many and they do not match good enough, the process of successive additions will stop after
a while telling that the next best candidate has not those good correlation values asked for.
After an "Add best members..." operation, there may still be some samples left which could be added after a visual inspection. To find out how all samples left matches your new target collection: 1. For the target collection, click "Create mean value sample" 2. See that the resulting sample is selected as the Reference! 3. See that the Settings/Options for normalization and matching/Least overlap... value is set to 50 3. In your "many-samples" (unsynchronized) collection click "Test towards reference" This will give you a list where all still not added samples (those still checked) are listed with their best and next best matching points towards the reference. If you find any sample which you really believe could be set at its right position, then double-click it and do a visual inspection. If it really fits, consider adding it to the target collection. Sometimes it happens that you can build a second - in time parallel - reference curve (separate collection) from a site. This could be because some samples are taken from one place and others from another place. In such a case you may restart the addition process to create a second collection. Building the first collection: 1. Start from an "unsorted many-samples" (unsynchronized) collection containing those samples you want to find the right offsets for.
Restarting - Building the second collection:
How to select those members not within two already created collections, BEST1 and BEST2?
When you have two collections BEST1 and BEST2 and want to add them together:
|
|
There are four buttons in a collection window for quality control calculations:
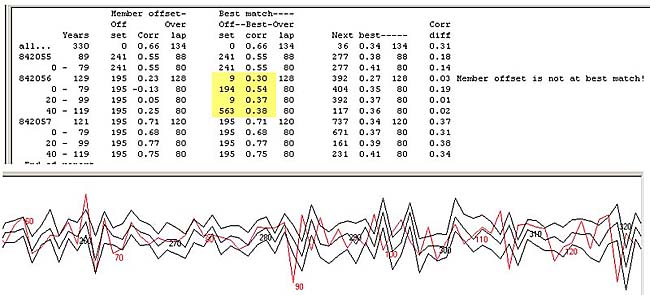
1. "Show cross correlations" with various options and the chocolate graphics to show the quality of the matches. 2. "Test towards reference" which gives you a table showing how each member matches towards the current reference.
If you see that the box "With block checking" is checked, you will get a list like that shown above. If a block of a sample has a
high correlation while the other blocks have low correlations, this is an indication of a missed ring. This can be checked
by double-clicking on the sample in the collection list and then inspecting the diagram as shown above. Here a year-ring is
obviously missing between year 80 and 90 (when counted from left to right).
3. "Test towards rest of collection". In this case each member is removed from the collection before a reference
is created out of the rest of the collection and that member is compared to the reference. When there are few members
in a collection this is an important tool for analysis.
4. "Show time lines" which gives you a plot showing how the samples overlap each other over time. Any zero values within a sample is marked with an "x" in the time line. Collection reports can be saved in a file. You can copy (Ctrl-C) selected contents of a report and paste (Ctrl-V) it into a document. Time line plots can be sent to the printer and then cut and taped together in a long strip. Note: The "Create mean value sample" button operates only on checked members of a
collection. This way it is easy to exclude a member from the reference curve of a collection to e.g. compare that member
visually to the rest of the collection. To do this, uncheck that member. Click on the "Create mean value sample"-button.
Double-click on the unchecked member to open it and click for a correlation analysis in its window.
|
|
With the automatic mechanism for adding best members to a collection in CDendro, you can quite soon rebuild an independent reference curve from its components. An independent or freestanding curve is a curve
Other (published) curves which are not independent are those with e.g. a block of zero-values somewhere in the middle. Or with a younger part overlapping the older part with 30 years and a correlation coefficient of 0.14. An example of a zero block curve is the ITRDB file swed023w.rwl from Jämtland in Sweden. It covers the time 1827 - 1107 but has 25 years without values around 1327. The older part of this curve is no doubt dated towards a reference curve from a nearby place. Also the younger part of the curve must have been dated that way. This creates a methodological problem: If many curves depend on the dating of other curves which depend on the dating of yet another curves we may run into trouble if an error is introduced somewhere on the way. This is especially true the longer back in time we are dating. Therefore, it is essential to document how a curve is created and dated and on what material it is based and
how samples are related to each other.
This is especially important when some samples are short or has not so good correlation to other samples in the curve.
|
|
If you already have a long reference curve from a nearby place, you can use that curve as a basis for a new curve. Start with a cross correlation analysis of your sample data and start building a curve with the "Add best members to target collection" button. When you have a number of overlapping samples in your new collection, check its correlation towards that curve from the nearby place. If there is a strong correlation between the two curves, you can use that nearby curve as a "seed" or starting point when building on. Save your nearby reference curve as a normalized data file (.d12) or a .wid file and add that file to your new collection. Then build on. When you are ready, you can easily remove the "nearby curve" either by unchecking that member or by deleting it. Using a seeded curve makes you work much faster than otherwise. Though if you have any errors in that nearby curve, they will surely be transmitted to your new curve - so be careful! One more word of caution: Climate may change over years and there may be cases where two places have the same climate during one period, but not during another. Especially when going far back in time, be very careful and validate (and document) what you are doing. Guessing is not a tool to use! Note: When trying to rebuild an already existing curve, it may be suitable to have the "Tell bad dating" checkbox checked. On the other hand, when you are building from your new own samples which surely are not already dated (or if dated, you know their dating is wrong) , the box should be unchecked to avoid unnecessary warnings. |