Last update 13 Febr 2023.
Jump to: Auto place points on very high resolution images
|
|
You can save lots of time when measuring tree rings by using a mechanism in CooRecorder for automatically placing points at tree ring borders!
Here is how to use this feature!
Open an image of a properly grinded tree sample:
1. Select from the menu "File/Open image for new coordinates"
2. Select the image from the filename dialog box
3. Select "Sorted data (e.g. Dendro)" as usual for a tree ring sample.
4. Use the magnifier-glass button or the Actual pixels button to see your tree rings properly.
|
|
 |
|
5. To lay out a chain of ring border points: Click on the button "AutoPlace"! Click OK in the pop up window.
|
|
 |
|
6. Now you should click at two points on the image. The point chain will be layed out between these two points.
After you have clicked the first point, the image will look as above. - The second point should be set more near to the heart of the stem.
|
|
 |
|
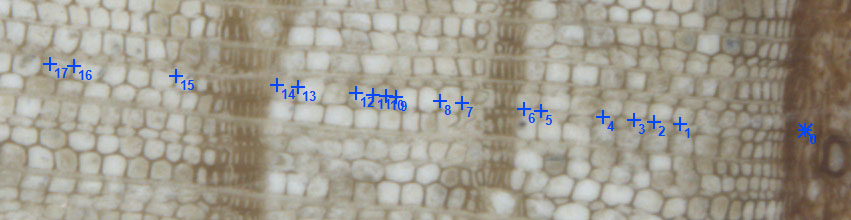
7. When you have clicked the second point, the chain of points is layed out as shown above! All is done completely automatically after you have shown where you want your points!
|
|
 |
|
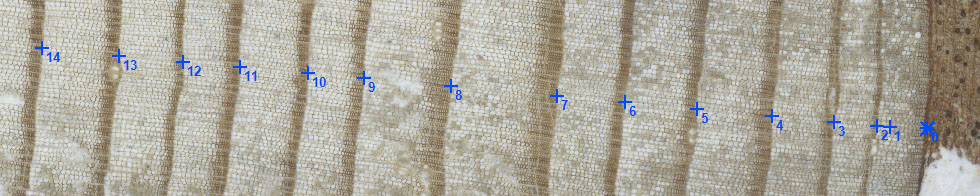
To avoid measuring diagonally over ring borders it is best to lay out several segments of point chains
and not make one long straight line of points across the whole sample! This way you can control that ring width measurements are done in right angles to the tree ring borders.
You can easily turn the AutoPlace command on or off with the A-key or by clicking on the AutoPlace button or by clicking on the ESC-key.
|
|
 |
|
Automatic placement of points works fine for clear and sharp images!
When the image is unsharp or there are cracks or discolorations on the sample then CooRecorder will be
fooled to place points where they should not be. - Or the program may miss an unsharp or very thin ring.
Above is an example of a missed ring from a sample of a log which has been standing in clay and mud for a 100 years under a pier.
|
|
 |
|
Here is another example where the program sets non-existent ring borders.
|
|
 |
|
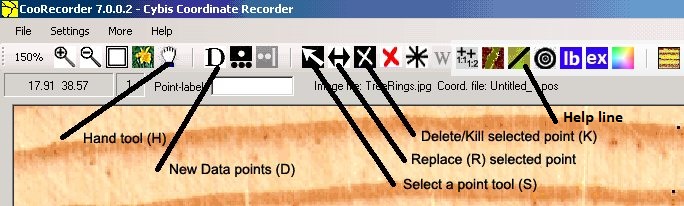
You have several easily accessible commands to quickly clean up an area with superfluous or misplaced points.
Use your left hand to select a command from the keyboard with the S, R, D, K or H keys.
Use your right hand for positioning and clicking with the mouse.
How to cancel misplaced point-chains: If your last chain of points contained too many misplaced points you can
easily cancel them all by clicking
the menu command "More/Cancel latest auto placed points (C)".
This command is also available through the C-key on your keyboard. You can press it several times to remove
previous chains. - There are also two Erase-commands, see the menu command "More"!
Tip: Use the N-key to toggle the display of point numbers.
|
|
|
Tuning the pattern recognition mechanism to identify ring borders better.
Tuning can be done in two ways:
- Tuning for the earlywood and latewood shades.
Click the menu command "More/Tune auto place mechanism to background of this image".
Then click on two nearby points along a line where you want to automatically place your border points.
The two points should enclose at least the length of the widest ring along the line.
- Filtering out grainy areas when going from latewood into earlywood of the same growth season.
There is often a zone of thin dark stripes or irregularities in the wood in the transition area between
earlywood and latewood of the same growth season.
Such areas can be discarded by defining the width of a narrow zone along the borders within which anomalies in the wood are ignored:
Click on "Settings/Other settings".
Set an appropriate pixel-width to "When using Auto-place of points: Lowest width of earlywood (in pixels)"
The value depends on the dpi resolution of your image and of the character of your wood.
If your samples typically have very thin rings you need a low value like the default 20 pixels.
If your samples have typically very wide rings you can set the value much higher.
|
|
Improvements of the AutoPlace mode
|
 |
|
When you have set the start point, a thin line will connect that point with your cursor to
make it easier to see where to set the end point. A perpendicular line is also drawn which should be parallel with the tree rings at the best position.
|
|
Auto place points on very high resolution images
The AutoPlace mode makes it easy to automatically place points for images with very clear ring borders,
i.e. pine and spruce. With a very high image resolution showing the cell structure, the AutoMode at first did not work (showing lots of obviously false rings).
After adjusting two CooRecorder settings "Path width for auto mode tracing"
and "Lowest width of earlywood" the AutoMode will do a much better job.
|
|
 |
With the default settings for automatic ring detection, that detection does not work well as shown above ...
This is a 14000 dpi image (pixel size = 1.8 micrometres).
A visual scan along the image reveals that the most narrow earlywood found is 90 pixels wide.
So let us set the parameter Settings/Other settings/Lowest width of earlywood from its default value of 4 into (for now) 70,
and then try again.
|
|
 |
|
This is much better, but not good.
When you set the two end points for an auto place, you actually show CooRecorder a path along which yearly rings should be detected.
In old versions of CooRecorder (before 9.2) this path was always 40 pixels wide. With such a narrow path at this high resolution
an irregularity in the wood might easily be mistaken by CooRecorder as a ring border. In this case a path width of 160 pixels would be more
appropriate. It corresponds to about the width of one of our medium sized rings in this image.
I have tried to demonstrate the case in the two images below:
|
|
 |

Set path width for auto mode tracing...
|
 Much better, but still a few false rings pop up.
|
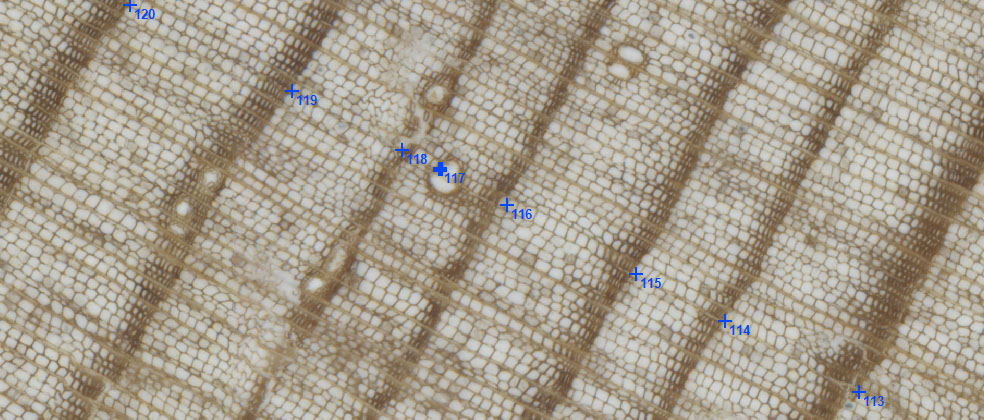 This type of error (at ring 117) is difficult to avoid.
|
|
With these parameter settings, it seems that the auto mode will still save time when measuring a sample also when working with high resolution images.
Though you always have to check the auto measurements visually!
Now, running with a 160 pixels wide auto place path for an image from a standard 2000 dpi scanner would neither be good.
So you have to remember to always set both the "wideness" parameter and the Lowest width of earlywood parameter in relation to your current image resolution.
|
|
- You can make the helpline snap to (i.e. start at) the nearest point. This makes for better precision when it comes to
placing points along a straight line.
- The AutoPlace helpline can be made to both snap to the nearest point and to stay on your screen after the AutoPlace points are set.
This facilitates adding points missed by the AutoPlace mechanism as the helpline is still in place.
|
|
AutoPlace (A) help line and (standard) Help Line (Q,P) made more useful:
|
|
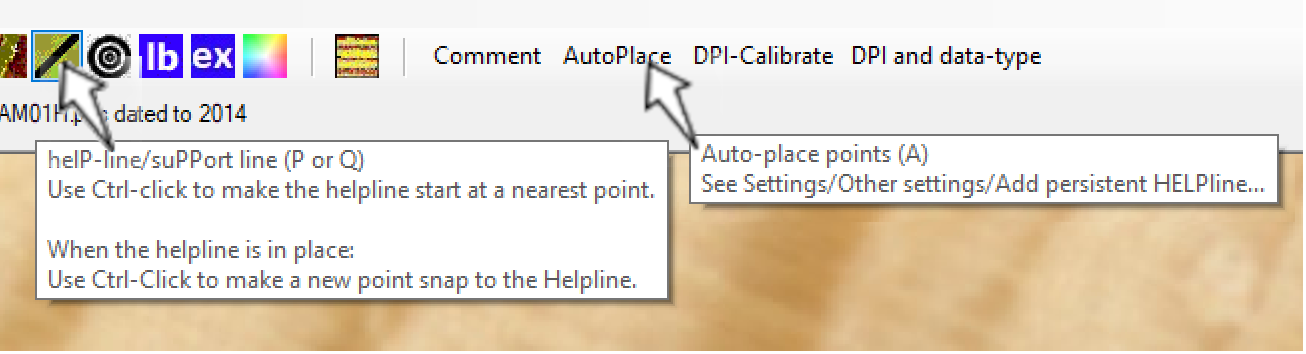 Diagram 1
|
- As a new option, the helpline drawn during an AutoPlace (A) of points can be left on your screen.
With the help line in place you can add points missed by the A-command by Ctrl-clicking
at a (missed) ring border near the helpline. That will make the new point snap to the helpline!
You can turn on this option by checking "Add persistent HELPline to a new AutoPlace sequence of points"
at Settings/Other settings.
- You can make the AutoPlace help line always start from the nearest point.
This option is also set at Settings/Other settings.
- The standard help line (P, Q) works as before, but if you combine it with Ctrl-Click, the line will snap to the nearest point.
Note: To remove a help line, click twice on the Q key.
|
|
Jumping from point to point with the Tab key
|
After using the automatic ring detection mode (the AutoPlace command) it happens that the position of many rings need to be adjusted.
To aid in jumping from point to point, you can now use the Tab key to step forward from the selected point and to the next point. To step backwards, use Shift-Tab.
As before you can use the S key and click on a point to make it selected. To move a selected point, either use the Ctrl-arrow keys or
press the R key (Replace) and then click the position where you want to anchor the point.
Thanks to Russell Kramer for the idea of having a keyboard key to easily jump to the next point.
|
|