|
|
CDendro 9.6
 For a sample window, there is now an extra tab to the right of the Workbench and Curve display tabs. This is used to hold correlation info (CC and T) and make it more visible than before. This is useful for demonstrations. Note: By using "Settings/Plotting window settings" the height of the diagram above was made smaller than by default and the height of the ring width curves (green/blue) were made greater than by default. |
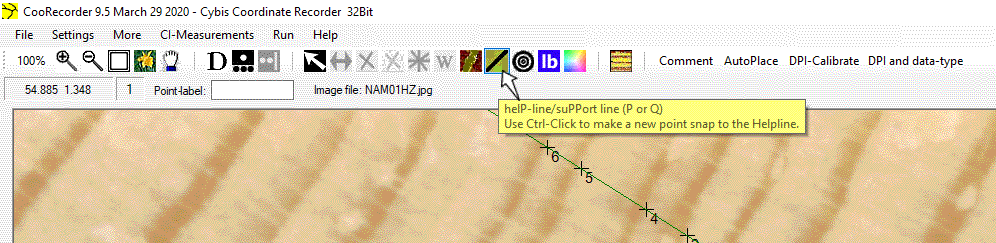
 The Curve display diagram with basic corr info can be copied to the clipboard by help of a button above the "Reload datafile" button on your screen. (See first figure above.) Right-click to get the image with more extensive corr info. This is useful for documentation. |
 Multi curve diagrams:"Collection: Plot all members-button-diagram": Vertical rulers now made available by checkboxes and their tooltips. This makes it easier to check synchronization between curves. Two rulers above show the years 1940 and 1959 - two very dry summers almost without rain. Note: Vertical rulers: Vertical rulers are vertical lines crossing the curve diagram. They can be placed either at a certain year or anchored in the current reference curve. The corresponding year number is always printed at the top of the ruler. If you check "Settings/Plotting window settings/Print ring width for each ruler" you will get also the ring width printed below the year number. This might be useful for demonstrations or documentation. |
|
Season wood (late-/early-wood) .pos files can be added to an empty collection and saved using the .fil format. Ring width data can then be extracted in Heidelberg (.fh) or Tucson (.rwl) format by using e.g. Collections/Save current collection.../as Heidelberg formatted file or .../as Tucson .rwl file ... while -in older versions of CDendro- Latewood and Earlywood data could be extracted only to .rwl collections (i.e. only to Tucson format) using /Save Late and Early wood in .rwl ... format. This implied a limitation to users working with the Heidelberg format because they have long collection member names like "JEZ03_LADE_01A" which cannot be written to a .rwl file if not first converted to a shorter variant. There is now a new command Save Late and Early wood in .rwl or Heidelberg .fh format. If such a Latewood .fh file is then run also through the Heidelberg STRIPPED filter (Save current collection/as STRIPPED Heidelberg .fh file...) the resulting collection can be imported into the dplR system. (The filter removes the separate .fh file header and inserts a DATEBEGIN property in each collection member while also removing other properties unknown to dplR.) All this allows for quick export of e.g. latewood .pos data from CooRecorder to e.g. dplR for futher processing.
|


|
Any collection can now be written with "Heidelberg single column format". This format implies that you can save a short text tag together with every ring width value as you can do with "Point-labels" of a .pos file in CooRecorder. This opens up for a more extensive use of "Point-labels" in CooRecorder, i.e. for saving classifications of significant tree rings. If CDendro users want to use this feature, then some support for label handling can be implemented on request in the next version of CDendro. Command to use:
Please note that only members (samples) containing some point-labels will be written with the "Heidelberg single column format" ("DATA:Single"). Members without any point-labels at all will be written with the normal "DATA:Tree" .fh mode. Note: In CDendro 9.5 and before that command was named "Collections/Save current collection.../as Heidelberg (.fh) with all comments and RingComments ("pointlabels")" |
|
Fixed errors:
Import and convert tabular data/Import a multicolumn table of data: Better input dialogue and error handling. Overwriting of a cropped member of a collection proposed keeping the old endYear of that member even when the cropping was done at the end. |
|
If you had "Make comments box pop up automatically" checked and you then cancelled an Open-coordinate-file operation, you got a run-time error (which could be ignored). This is now repaired. CooRecorder y-command did not work properly when applied to a point inside of an already dated point series. Fixed. |
CDendro 9.5
|
CooRecorder 9.5

When opening a .pos file containing registration of the pith position, that position will be shown even when it is outside the image area.
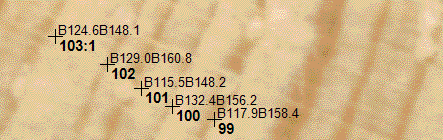

When too many numbers are shown:
Thus the plus characters can be made visible alone on an image! |
|
|
|
What's new in version 9.4 (Sept 10 2019)?
CooRecorder: What's new in version 9.3.1 (June 5 2018)?Corrected error for the command button "Show cross correlations" for a CDendro collection: What's new in version 9.3?High resolution images and the AutoPlace points mode The AutoPlace mode makes it easy to automatically place points for images with very clear ring borders, i.e. pine and spruce. With a very high image resolution showing the cell structure, the AutoMode did not work (showing lots of obviously false rings). After adjusting two CooRecorder settings "Path width for auto mode tracing" and "Lowest width of earlywood" the AutoMode will do a much better job. See Auto place points.
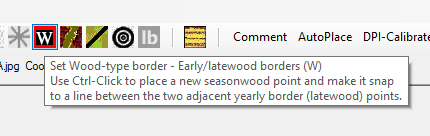
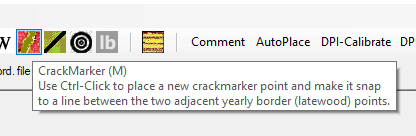
Better precision when setting W (Seasonwood) and M (crackMarker, %gap) commands
What's new in version 9.2?>>CooRecorder is now able to handle quite big images!<<As a reference: On my 64 bit Windows 10 machine with 16 GB RAM memory, I can open a big image which is 84000 pixels wide and 4000 pixels high, though it then takes about six seconds to load (open) that file. After loading, the program and image updates run as fast as when handling a normal small image. What's new in version 9.1?Image updates were slow for big files: CooRecorder 9.0.1 was very slow on image updates when width or height were above 32767 pixels (very big image), though this worked well in version 8.1. This has been remediated in version 9.1.The command "Add best member to target collection" is intended to help you crossdate an unsynchronized "source" collection.
NEW TOOL: Alt-click on a collection member creates an empty collection, adds that member to it (as a "seed") and turns back to the source collection to allow for running Add best member... VERY USEFUL when you have to work with many subcollections. Info available on Alt-click at any collection column header. Show Cross correlations/Sort matrix: Sort by number of matches with T>=6.0: Will count the number of T>6 matchings between each sample and all the other samples. Useful to find a good starting point for a new subcollection. The numbers are stored in the "Sortkey"-row within the matrix (so see that you order display of the sortkey!). (The T-limit can be adjusted from e.g. 6 to 7 by Settings/More settings.) Add best members to target collection can now check that there is a discrimination between the best match and the next best match by specification of a minimum difference between the best and the next-best T-values. Warning on high-T duplicate matches: If a next best match has a T-value above 6, this will make a warning. Stop for investigation in the middle of an automatic addition process: There is now a way to stop the auto-mode addition after the addition of a certain memberId. This is useful when rerunning an addition process where you want to analyze a questionable step done somewhere in the middle of the process. A note can be entered "by hand" into the "report-area". This is a way to add information which should not be forgotten. Add best members to target collection now keeps all settings from run to run, i.e. the automatic mode is kept.
What's new in version 9.0?
|
To top
|
|
In old versions of CooRecorder an image file and its .pos file should always best be kept in the SAME directory. If they were stored at different places in your computer and then moved to quite another place, it became complicated to later re-open the .pos file in CooRecorder. A project with many big image files mixed up with the small .pos files easily fill up several GB of disk space which makes backup a bit clumsy.
When image files are not updated as often as .pos files, it might be better having image files and .pos files stored separately.
This is especially true when two persons, working on the same group of images, want to exchange fresh copies of their .pos files.
|
To top
Tell CooRecorder where your files are stored! |

|
You can now specify in which directory tree you have stored your project's .pos files and where you have stored its image files. You can save such path information in easily accessible "project files" so that you can quickly switch from one project to another. When .pos and image files can be stored in different directory trees, it becomes feasible to handle their backup separately. When a ".pos files directory tree" is specified as a path, this path will be used as a proposal when the .pos file is saved for the first time. A student may save her .pos files in her own directory while the image files are already stored in a common storage elsewhere. We could do that before but it then easily resulted in problems when files where copied to another computer and should be reopened there. Note: When you have image files and .pos files stored the old way in CooRecorder (i.e. in the same directory), then you should set the same path for the image and .pos files directory trees. This is shown in the picture above. For more info, use the Help button to find out more details on how to use the project paths and the other mechanisms described below. |
To top
Looking through the .pos files of your project |
|
You can make CooRecorder scan through all the .pos files and image files within your .pos and image files project directories. The report from this scan will give you a list of all images found together with sublists of .pos files referring to these images. This makes it easy to see which images have not yet been measured. .Pos-files without an existing image file will also be listed separately. This list can also be used to inspect measurements. When you click on a .pos file name, the file will open in the background. With a click on F2 the list will get out of your way so that you can magnify the image and inspect the measurements as normal in CooRecorder, before you again click on F2 to turn over to another .pos file. This mechanism might also be used for a class room demonstration of various samples and measurement paths. The report itself can be copied to a textfile for documentation. |

| Use the Look for button to open the file list above. Use the Search button to search for files. Use the F2 button to show or hide the form. |
|
Note: Delete a .pos file When looking into some .pos file as described above, you might find that it should be deleted. This can be done with the CooRecorder menu command "File/Close and DELETE current coordinate file" without looking up that file in e.g. Windows Explorer. Note: Comment box popup in CooRecorder "Other settings/Make the comment box pop up automatically" now also works when an already existent .pos file is opened. |
To top
Jumping from point to point with the Tab key |
|
After using the automatic ring detection mode (the AutoPlace command) it happens that the position of many rings need to be adjusted. To aid in jumping from point to point, you can now use the Tab key to step forward from the selected point and to the next point. To step backwards, use Shift-Tab. As before you can use the S key and click on a point to make it selected. To move a selected point, either use the Ctrl-arrow keys or press the R key (Replace) and then click the position where you want to anchor the point. Thanks to Russell Kramer for the idea of having a keyboard key to easily jump to the next point. |
To top
When turning from CDendro to CooRecorder - The CooRecorder icon |

The CooRecorder icon in CDendro: "Find the .pos file of this collection member and open it!"What happens when you click the CooRecorder icon in CDendro?
|
To top
A new crossdating tool: "Corr to target members" |


|
This matrix shows how your collection members match towards the members of a target collection containing several reference curves. The match is done either to check the "current offset" (current dating) or to find the best matching offsets". The result is a matrix with your reference curves on the rows and your samples in the columns. This tool is particularly useful when you have many samples of unknown origin, when wood has been imported from a wide geographical area. The matrix can then be used with a high number of columns (undated samples) combined with sorting the best matching (chocolate colored) samples towards the left part of the column to quickly find easy crossdatings. The matrix can also be used to document the sample matchings for a single site. Below each column in the matrix, you will also find a small table showing the "most popular" dating years and their crossdating quality (T-values). Year Count MeanT MaxT 1980 2 3.7 4.6 1978T 4 6.5 9.0Meaning that four of our reference samples had their best crossdating towards this sample at the same endyear 1978 with a mean T-value of 6.5 and a maximum of 9.0 This type of small table has also been added to the "With condensed report" of the "(Test towards)..undated ref." command. Year Count MeanT MaxT 1019 2 4.0 4.0 1740 2 3.5 4.1 1990 6 3.6 4.5 1843 2 4.9 5.1 1821 2 9.1 9.9Earlier versions of CDendro only had the year and the count column. Now the MeanT and MaxT reveals that the correct dating is at 1821 though it has only a count of 2. |
To top
Various enhancements |
To top
The menu at a collections column headers |
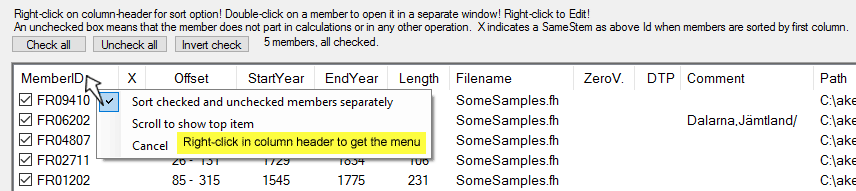
If you right-click on one of the column headers of a collection, a small menu will pop up.
|
To top
A new collection column with overlap data (OVL) |

|
The collection members list shows a CC and a TT column after you run e.g. a "Test towards ref." command. (Test towards reference) With the new version there is also a column headed by "OVL" displaying the overlap for that match. Note that you can temporarily reorder the columns for e.g. your documentation: Just drag a column-header towards left or right. |
To top
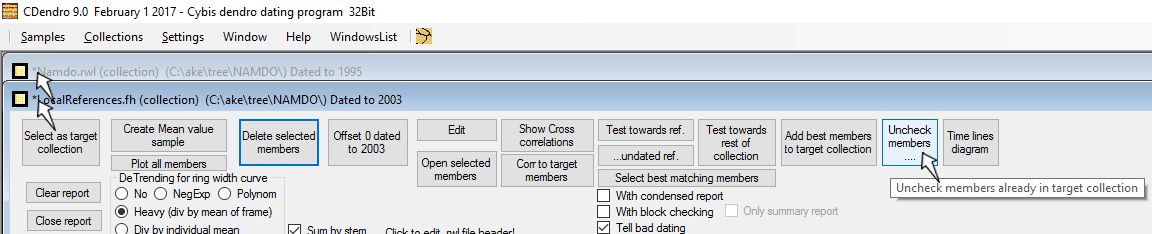
Changed files are marked with an asterisk (*) - Uncheck members |
|
To top
More readable file formats: CHRONO, CRN, VELMEX .rwl |
|
Chrono files. Heidelberg chrono files should now be readable. CRN-files with not only one series but with RAW, STD, RES and ARS variants can now be opened in CDendro. CDendro can now read some VELMEX decadal/rwl files like cc322602 130 1548 2018 1120 1842 1734 828 1342 1152 1564 1090 wb cc322602 140 1108 1074 -9999 wbwhere the "wb-tag" made old versions of CDendro reject the file. |
To top
Create reference curve from big decadal file - Updates |
|
|
To top
The "Members" property |
|
When a mean value is created out of a collection also a "Members" property is created showing the first member names like: Members=EST002_3EP281AV+SE_FINL+latv001+Latv002+lith001+lith012This is useful to check when a mean has been created out of a few references (chronologies) and you are in doubt what is actually used within your current mean value reference. Note: The length of this property is currently limited to 230 characters. |
To top
Better compatibility with Cofecha when it comes to missing rings/zero rings |
|
The missing data mark is not well defined for .rwl files, though usually the mark "-999" is used within 0.01 mm files, and "0" in 0.001 mm files.
It seems that Cofecha is handling these two marks differently: When Cofecha runs over a -999 value, then the series is broken into two series by this mark.
While a single "0" value seems to be handled as an "absent" value which is just omitted from correlations.
CDendro now has a setting to make missing values written as "0" also when writing .rwl files having 0.01 mm measurement units, see
Settings/More settings/Decadal file measurement unit/Write in units of 0.01 mm/Then write a missing ring as "0" also in rwl-files
Note: This setting will not solve the problem that Cofecha splits your series into two separate series when it detects three or more consecutive missing rings. If you want Cofecha to handle such a sample as one sample instead of two, you have to "measure" each consecutive zero ring over and above two with the minimum width possible, e.g. 0.01 mm. If you leave at least one "genuine" zero-ring (a "0") in that gap, CDendro will count the zero ring and show the total count for the sample as a warning. |
To top
Import of single column data to CDendro |


| A ring width column can easily be imported. See that you set zero into the field marked 8 and see that you save as a .wid file. Note, that the column data may be interpreted as having EndYear on top or on bottom of the column. |

|
"Import a single column of data from a table" allows not only plain import (as for ring widths) but also of first adding an offset to the data to e.g. make all values > 0.
This can be used in a case when data is given as a positive or negative deviation from a mean value, while we want to display it as if it were (all-positive) ring width data.
After you click "Read input column", the value range of the data will be displayed so that you can decide on how much to add. (In this case 5.0) |

| In this case we got two .wid files which look almost the same when displayed in CDendro. Note that the green curve is displayed with the checkbox "Ind. ring-w scaling" checked. |
To top
Retrieve settings from an old CDendro (or CooRecorder) version parameter file |
|
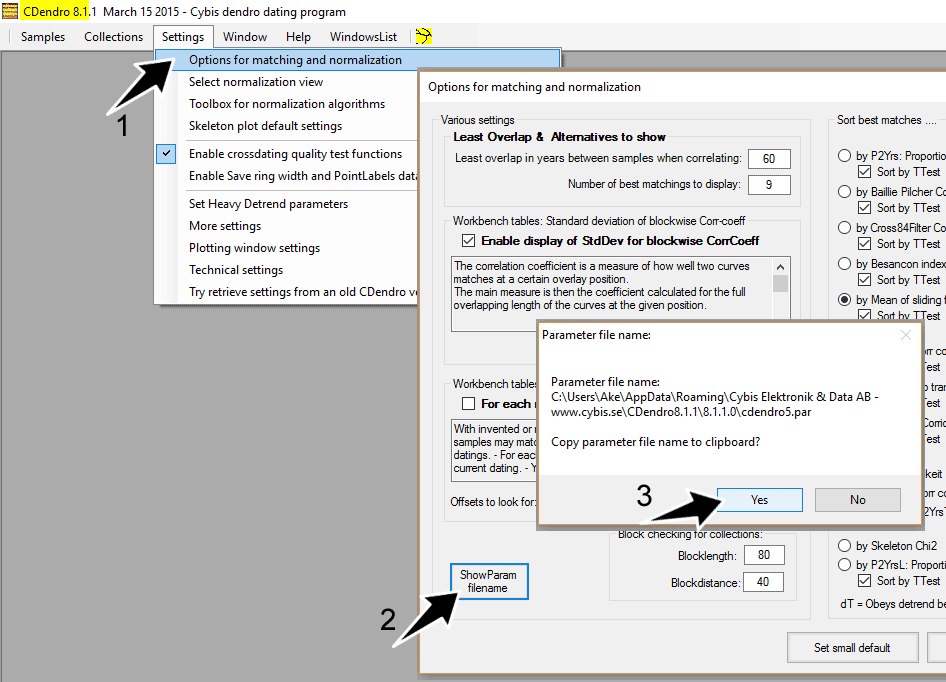
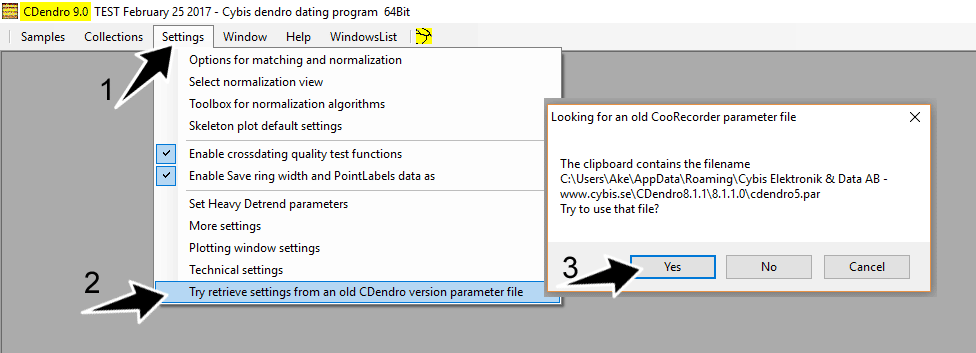
There are many settings in both CDendro and CooRecorder that are saved when you close these programs. When you upgrade to a new version of CDendro & CooRecorder you probably want to take your old settings with you. Here is how to do that
If you need to upgrade from an older version of CDendro & CooRecorder, you have to follow about the same procedure, but the the program will only show you the actual file name. You have to write it down. When you then want to retrieve the data from within CDendro 9, you will have to search for the right filename in an open file dialogue box. |
To top
Which are "the new highlights" in CDendro & CooRecorder 9.0? |
Of course many small enhancements have a great value together. But these are the "new things" which I think are most important:
|