|
|
|
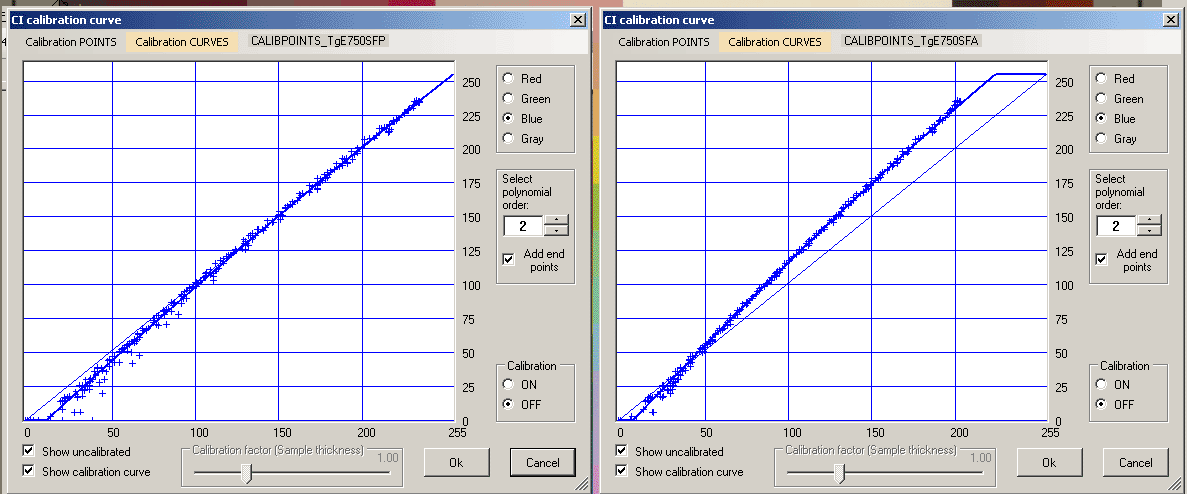
When using various calibration software for your scanner, you may anyhow by mistake get uncalibrated values. Here we will show some ways to inadvertently make your scanner uncalibrated. All examples are based on using an IT8.7/2 calibration card when making the calibration and then (after the calibration) scanning that same card to a new image from which blue CI data can be compared to the blue data specified for the calibration card. We have a proper calibration only when these two data sets look about the same. In the diagrams below, this is when corresponding points from the two sets end up along a straight line from (0,0) to (255,255). (See e.g. the left diagram (Fig 1) below this text.) Note: Blue CI data measured from an image is plotted along the horizontal x-axis. The corresponding data from the IT8 calibration card data file (colorimetrically measured values from a card of the same batch) is plotted along the vertical y-axis. |

|
Fig 1: This is an analysis of a scan from an Epson Perfection 750 Pro which was first calibrated using Silverfast.
The Silverfast option "Options/Profiles for ICM/Rendering intent" was (by default) set to "Perceptual".
The curve shows that dark blue values became a little bit too light and has to be made somewhat darker if the data should comply exactly with
the data specified for the calibration card. Anyhow this looks as a reasonably good calibration.
Fig 2: This is an analysis of a scan done on the same scanner but the Rendering intent was now set to "Abs. colorimetric" which we from the name might expect to give us a really high quality calibration. The diagram tells that most of the blue color of the scanned image has been screwed-up and has overall to be made lighter to comply with the data specified for the IT8 calibration card. (E.g. spots measured as blue=150 should be changed to 175 to comply.) What can we learn from this? From this we might learn to never tamper with a parameter without carefully checking the result! Note: In the Fig 2 case above only the blue channel became screwed-up as shown. The green channel was not affected. |
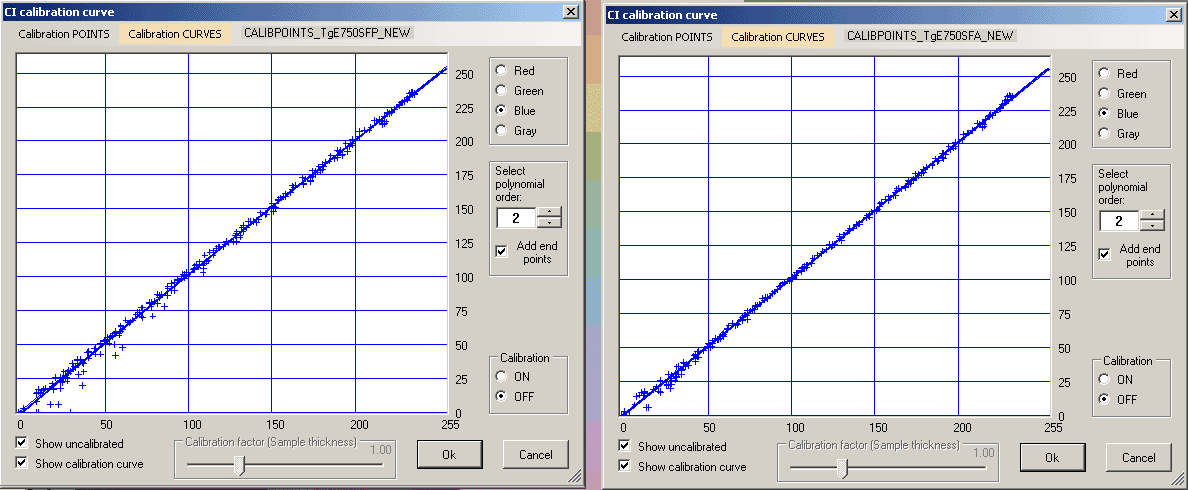
A useful calibration curve!?If we look carefully at Fig 1 and Fig 2 above, we can see that the points are less scattered around the estimated calibration curve in Fig 2 than they are in Fig 1. We can use this to create a useful blue calibration procedure. We will now compare the calibration quality achieved from using either "Perceptual" or "Abs. colorimetric" rendering intent together with the CooRecorder calibration adjustment mechanisms. First we save the curves presented in Fig 1 and Fig 2 as calibration curves in CooRecorder. Then for each of the scanned images we use the corresponding calibration curve together with the command "CI-measurements/Transform current image by calibration" to create a new transformed image which we also save. We then make an analysis of both new images to see how their blue values comply with the data specified for the IT8 calibration card. |

|
An analysis of these two new images reveals the calibration result shown in Fig 3 and Fig 4 above. Apparently the use of Abs. coloritmetric rendering intent when scanning the image (see Fig 4) results (together with the CooRecorder adjustments) in a calibration which is very much conform with the data specified for the IT8 calibration card. To measure blue CI values according to this scheme, you might
|
Hitting an Image Auto-adjust or a Color Balance button will destroy your Absolute blue CI values!Various software packages have various names for a mechanism that makes your image look better, e.g. not so dull, more nice! There might be various adjustment alternatives e.g. for a landscape, for a portrait, for a night scene or for different light temperatures. There might even be mechanisms to enhance what is hidden in the shades or what is hidden in the sky. When using any of these mechanisms you destroy your absolute blue channel CI data. Let us look at a simple example. |

|
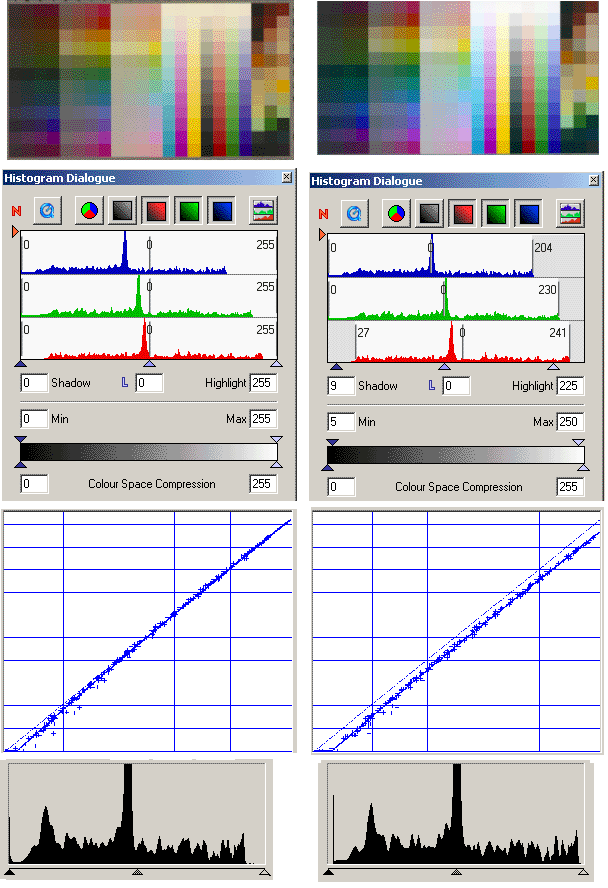
Here we have first (to the left) a calibrated scan with the Histogram being reset. To the right is shown what happens after we click the Image Auto Adjust button,
i.e. some very dark and some very light color values are cut away and others are moved to cover the full range of the available color space (to cover all available values from 0 to 255).
This will make a photo look less dull. This procedure is essential in an edit of a typical photo. But it will also make your blue CI values loose their right calibration.
What can we learn? Always see that the histogram is reset so that no very dark or very light values are cut away during the scan! |
Always look out for sticky settings!Say that you are scanning wood samples in the lab in the morning. You have set up your scanner to be calibrated. Then you go for lunch. During the lunch a colleague needs to copy a document or an old photo on your scanner. He/She does that and then leaves the machine. When you come back from lunch you just continue scanning your wood samples. But now you have the color balance settings that your colleague used when you were at lunch... With my (old) version of Silverfast this will happen even if you run a new calibration but without also resetting the histogram. To avoid this you should always check the histogram settings so that no dark or light colors are cut away during the scan! Otherwise your scans to be used for blue CI measurements will at best have to be redone. |
How to detect uncalibrated scanning? |