New feature in version 4 for tree ring measurements: (March 2005)
Auto-place command to automatically place tree ring bordary points along a line.
For more information on this see the section "Measure ring widths automatically" in the helpt text for the CDendro program!
Version 2.4.7 13 May 2004:
"Pixels mode" with dpi set to 25.4 did not work in the previous version. Now fixed.
It is not necessary any longer to set decimals to 0 when setting dpi=25.4 for a registration of pixels.
New features in version 2.4 October 2003:
Calibration of photos! See help text below.
Letters are now bound to some button commands: Hand tool (H), Zoom in (Z), Data mode (D), Select (S), Replace (R)
Example: Use S and R to quickly replace a point!
New features in version 2.3 December 2002:
See the section on Ergonomical aspects at the end of this small handbook about
using arrow keys to scroll and using a keyboard key to click on coordinates.
This way of using both hands when registering, works much faster
and makes much less strain to your body than clicking again and again on the mouse!!!
Remember: Avoid harming your body by sitting long times doing tedious work!
CooRecorder - Cybis Coordinate Recorder
The CooRecorder program is used for registration of coordinates taken from images.
You can use your computer scanner to take interesting photos of things which can be placed on the top of your scanner. If the things are transparent and small, they can be taped up on transparent film and then inserted into a film scanner. An image scanned as a photo from such a thing can be displayed on your computer screen. You can enlarge the photo to see interesting details and you can write down coordinates of these details. It is a very tedious job to do this very manual registration if you have an interest in lots of data for later statistical analysis.
Our CooRecorder program solves the problem by letting you just click on interesting points in your picture. The coordinates of these points are automatically written onto a file which you can later analyze with another program.
When do I use the program?
I do have this registration problem for two of my own interests: Bee-keeping and Dendrochronological analysis.Breeding for better bees. For bee keeping it is a matter of measuring characteristic data from bee wings. This data may tell if the wings come from bees of a pure breed or from a mixed up breed or from some special breed. Mixed up bees are often angry. A bee keeper tries to avoid angry bees, because they annoy his neighbours and he gets stung by them. Identifying a breed is also a matter of breeding for a lot of other qualities than just non-aggressiveness.
Dating old houses and other constructions of tree. For dendrochronological data it is a matter of measuring the width of tree rings. A long sequence of such widths from a tree sample can be used to find out the age of the tree. I.e. to find out when an old house was actually built.
Working procedure when using CooRecorder
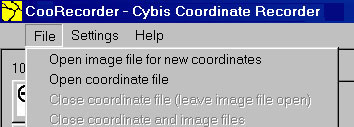
Click on File in the menu bar and select "Open image file for new coordinates". Select one of your .jpg or .bmp files.
When the file is loaded, a new window comes up:
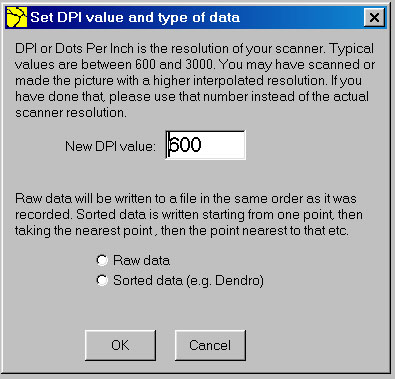
Set the appropriate DPI value and select Raw data (for e.g. measuring bee wings) or Sorted Data for Dendrochronological measuring (also named Dendro mode).
There are five buttons (and two scrollbars) to control the view of the image:
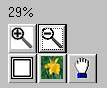
A magnifying glass, a demagnifying glass, a fit on screen button, an actual pixels button and a hand tool button (for dragging). The scroll bars are only shown when the image does not fit on the screen. Above the magnifying glass is a percentage indicator showing the current magnification of your image.
The magnification glass is a "zoom in" button. First click on the button. Then click on the appropriate point in your image. The view will zoom in an extra 50%. Click again to zoom more. Click on the demagnifying glass to zoom out of the image. (If the image disappears, click on the demagnifying glass until you get the image back again.)
To drag the image over the screen, first click on the hand tool button. Then click on a point in the image and keep the mouse button pressed down. Then drag the mouse with the button still pressed.
Recording
Recording aims at getting coordinate pairs registered on lines in a file, like here with three pairs on each line:79.76 9.31 95.59 10.84 86.11 10.96
79.76 9.44 95.42 10.84 85.89 10.92
Before you start recording you have to click the Data button which will then "light up":
There are two recording modes in CooRecorder:
One coordinate pair for each line:![]()
or a group of coordinate pairs for each line (data group mode):
![]()
If you are using the data group mode you have to click the End of data group button before you start recording the next group of coordinate pairs:
![]()
End of data group button
If necessary, you may switch between these two modes while recording.
For fast switching, you can click the right button on your mouse to do this.
You may use the Enter key as a substitute for the End of data group button.
Start recording by clicking on points on your image. The recorded points will be marked with plus signs. This is an example of measuring dendrochronological data where the coordinates will be written as one point per line (i.e. one coordinate pair per line):
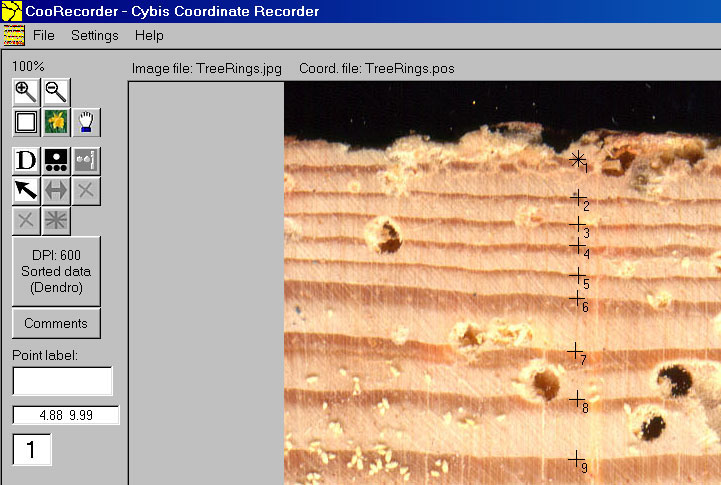
Note: The number of decimals shown for the coordinates to the left and also the numbers written to your coordinate files can be changed by parameter settings within the program. Also the numbers shown at the side of each point above can be hidden with an appropriate parameter setting. Even the colors used for click-marks and for numbers can be changed by parameter settings. Click on Settings in the menu bar to change these things.
There are a number of buttons for editing what you have recorded:

![]() A select button to
select a certain point.
A select button to
select a certain point.
Click on the Select button, then click on the proper point.
When a point is selected the other lower four buttons in the picture above will be enabled.
They are otherwise dimmed.
![]() A replace button.
A replace button.
First select a point. Then click on the replace button. Finally click at the new registration point in your image. This will move the selected point.
![]() There is a delete button - the black cross.
There is a delete button - the black cross.
This button will delete the currently selected point. If this point is part of a group, the whole group will be deleted. This is done so because deleting a point inside a group will probably make the order among the remaining points unclear. If you want to change some data within the group, either use the replace button to move individual points or use the delete button and then reregister the whole group.
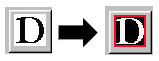
 There is a disable button - the red cross.
This button is used to disable single datapoints. When they are later written onto the file a "D" will be written directly in front of the numeric coordinate pair. This is usable for dendrochronological data, where some visible tree-rings are not actual year rings. You may want to register such an unclear point though you want to have the coordinate pair disabled until you know more about the sample. You can open the coordinate file later, select the disabled point and then click again on the disable button to enable the point.
 There is also a start point button.
Normally the first coordinate you click when recording is also the first coordinate to be written
to your file. Though when working with dendrochronological data you may want to register some extra points
later. Or you want to delete the original first coordinate pair from your data set.
Then it may be appropriate to indicate which point is the very first point of your data set. This button is only enabled when you are working in dendro mode and when you have also selected a point with the Select button (the button with the big arrow).
Writing your data to a file
Use the File/Save As command on the menu bar. Before writing data you have to select how data should be written, i.e. the output format.
There are two output formats: Raw data or Dendro data.
Raw data is what you would suppose it to be: Data taken from your first registration point and forwards until your last registration point. This mode will ignore any start point settings.
For a registration of three data pairs per line this would look like:
79,76 9,31 95,59 10,84 86,11 10,96
79,76 9,44 95,42 10,84 85,89 10,92
Note: The decimal comma used above as the decimal separator is that defined in Windows: Start button/Control Panel/Regional settings/Number/Decimal symbol. Probably you have your Windows system set up to use a decimal point (79.76) instead of the decimal comma shown above. For CooRecorder to work, you may have Windows set up either with a point or with a comma as the decimal separator.
Dendro data or sorted data is written from the starting point which you
may redefine with the Start Point button. Then the next point written is that which is nearest to the
start point. Then the point nearest to that point until there are no more points. In dendro mode,
coordinates are always written with decimal POINTs and with a comma between the x- and y-coordinates, like
9.31,2.54
9.44,3.43
9.40,4.78
Group (or Point) labels
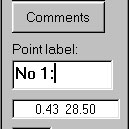
Before you start to record a new group of data you may register a "label" or "key word" for that group. Just write down your word (like "No 1:") into the Point label text box. When you then click for a new point, the label will be attached to that point. If you have several points within a group of data (group data mode), there is only one label saved for the group, though you may enter it for any one of the points. The labels will be written at the end of the lines in your data file, like
6,49 1,19 9,93 1,63 7,84 1,52 8,00 2,19 8,41 2,41 8,60 2,36 7,80 3,06 #No 1:
17,74 2,09 21,21 2,44 19,11 2,43 19,17 3,04 19,75 3,30 19,92 3,25 19,13 3,95 #No 2:
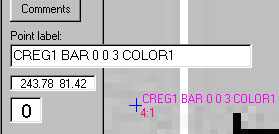
If you want to change a label, just select a point within the group, click on replace and enter the new label into the Point label text box. Then click on the point in the image again.
This is a very useful way to mark suspected and even disabled points. A disabled point with a label will look like this in a dendro file:
14.52,77.00
14.60,80.18
D14.60,80.94 #false ring?
14.71,82.63
 Note: If you double click in the label field, the field will get wider so that you can enter a
longer label text if necessary. Double-click again in the field to make it normal.
Note: If you double click in the label field, the field will get wider so that you can enter a
longer label text if necessary. Double-click again in the field to make it normal.
The comment button
There is a Comment button
![]()
If you click on this button, you can enter a comment about your data. The comment will be stored
into the coordinate file together with your coordinate data like this:
#DENDRO (Cybis Dendro program compatible format)
#Imagefile TreeRings.jpg
#DPI 600
#All coordinates in millimeters (mm)
SCALE 1
#C This is a sample from the old house at Bergvik, Nämdö .... this is the comment
#C taken in May 1999 after the house had been pulled down.
12.45,3.22
12.45,4.91
...
Tricks
A trick for dendro data:
Sometimes I want to continue measuring from a new point, like this:
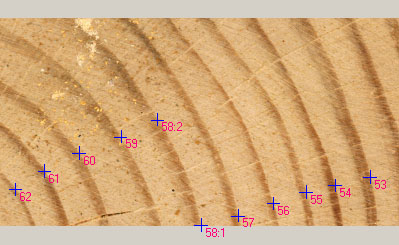
Here, this is done when going from point 58:1 to 58:2 on the same ring. Then I register point 58:1 and 58:2 as a group. So before clicking on point 58:1, I click on the datagroup button (the right button on the mouse will also do this):
![]()
Then click on point 58:1 and 58:2. The group mode will switch back automatically to single point mode when data is known to be dendro data.
The written data will look like this:
26.872,13.607
24.316,14.512
21.538,15.464
18.655,16.210 15.226,7.940
12.353,9.273
9.083,10.575
6.371,11.972
4.101,13.401
I.e. with the two points 58:1 and 58:2 on the same line. (The CDendro program, which you can download from the dendrochronology section of www.cybis.se, is set up to handle this type of grouped data.)
This is a very useful method when you have to make a jump in your measurements due to a crack or a cavity in the sample!
Pixels instead of millimetres:
If you need the addresses of your pixels instead of the millimetre measurements, set the DPI value to 25.4 pixels per inch. The coordinates written to your file will then be given in pixels (always without any decimals).Points on a horizontal or vertical line:
If you hold down the shift key while you click for a new point, that point will get the same x or y coordinate as the previous point set. (If your second point is more near to the same x coordinate than it is to the same y coordinate then the x coordinates will be made the same and vice versa.)Calibration of photos
When you scan a tree sample laying on your scanner you know that you are scanning in e.g. 1600 dots per inch (dpi). When you use photography (or macro photography) to get photos of things which cannot be put on a scanner, it is much more difficult to say how many dots there are per actual inch on a sample.To calibrate such a photo you have to know the actual distance between any two points on it. To make this you may have parts of a ruler visible on the photo.
To calibrate: Click on the "Calibrate DPI" button. A message asks you to click the two points which have a known distance. When you click the second point, a window pops up where you can set the distance in millimeters. The actual dpi value is calculated accordingly and shown on one of the buttons to the left.
Note: Using the calibration button to measure distances on a map.
If you have scanned a map with a scale on it, you can then calibrate it accordingly.
Later you can use CooRecorder to look at different parts of the map. If you want to quickly
measure the distance between two points, click on the Calibrate DPI button and set your two points.
The pop up window will show you the distance between the two points according to your previous calibration!
Ergonomical aspects
Plotting sideways.I get tired in my right arm and shoulder by moving my hand backwards and forwards with the mouse during a long time. I have found that it makes much less strain to me when I move my right hand SIDEWAYS. So when measuring a long dendro sample I find best to have the "measuring line" oriented horizontally on the screen.
Use optical mouse.
An optical mouse works much better than a mechanical one with a ball rolling on your table. An
optical mouse gives you a lot of comfort!
Arrow keys to scroll.
To make scrolling the picture without using the mouse, you can use the arrow keys!
Click with a keyboard key instead of using the mouse button.
I also get tired in my right hand by clicking with the left mouse button on that many new coordinates.
The command Settings/Key binding gives you a way of defining which keyboard key
to be used as a synonym of the left button mouse key. I prefer to use the
right shift key for this as it sits near the arrow keys on my keyboard.
So I position the cursor with the mouse in my right hand, and click
the coordinates on the keyboard with my left hand and I can quickly scroll using the arrow keys.
Right-click to enter group mode
![]()
The right button of the mouse is bound to the button for switching recording modes i.e. from/to group recording.
See above: "A trick for dendro data". By right-clicking on the mouse you can quickly
shift recording mode to change the starting point for your next sequence of coordinate points.
Remember: Avoid harming your body by sitting long times doing tedious work! You can quite quickly
get an inflamation in your shoulder or arm by sitting still during too long time with your arm strained.
Especially if you are a bit old you can get that from only some hours of bad sitting and it may last for
months before you get rid of it. Be careful!
Saltsjöbaden 22 October 2003
Lars-Åke Larsson
Cybis Elektronik & Data AB
Pålnäsvägen 1
SE-133 33 Saltsjöbaden
Sweden
email:ake@cybis.se
Do make a visit to our site on the Internet: http://www.cybis.se
In addition to our commercial information you will find lots of photo galleries with pictures from Stockholm and the Stockholm archipelago.
Disclaimer Cybis Elektronik & Data AB do not warrant the results you may obtain by using the CooRecorder program. In no event will Cybis be liable to you for any damages whatsoever arising out of the use or inability to use this program.